So how do we set up WordPress Multisite with Bluehost? If you use the one click installer (Simplescripts) within Bluehost to install WordPress and if you are on a shared server, normally you don’t get a ‘one click’ option to install multisite. The only way to make it work is to manually configure it. Now, you can find this info pretty much everywhere on the net but I am writing this for my own purpose so I can document it in case I need to refer to it in the future, as well hopefully this post will somehow help someone with the same hosting environment.
Please be aware that this step by step procedure is written for a fresh install, this post doesn’t talk about migrating or old install. Also, it’s with the assumption that you are with Bluehost. So, here we are.

STEP 2. Install WordPress using SimpleScripts within Bluehost. Ensure it is installed at the root level so you should have nothing entered after domain.com/ as everything entered after the ‘/’ will be treated as sub level and multisite therefore will not work.
STEP 3. Once it’s installed, FTP in to your server and download wp-config.php. Add a one liner code define(‘WP_ALLOW_MULTISITE’, true); to wp-config.php just before the “That’s all,…” similar to below, then upload it back to the server.
/** Enable WordPress Multisite **/
define('WP_ALLOW_MULTISITE', true);

/** That's all, stop editing! Happy blogging. **/
STEP 4. Refresh your browser, you should now have the ‘Network Setup’link under the ‘Tools’ menu. Click on it and you should see the set up page. 
STEP 5. Before you click the Install button, you need to create a directory within the ‘wp-content’ directory. The directory must be named ‘blog.dir’ so once it’s created, it will look like wp-content/blog.dir. This directory is used to store the media files for the additional subdomains.
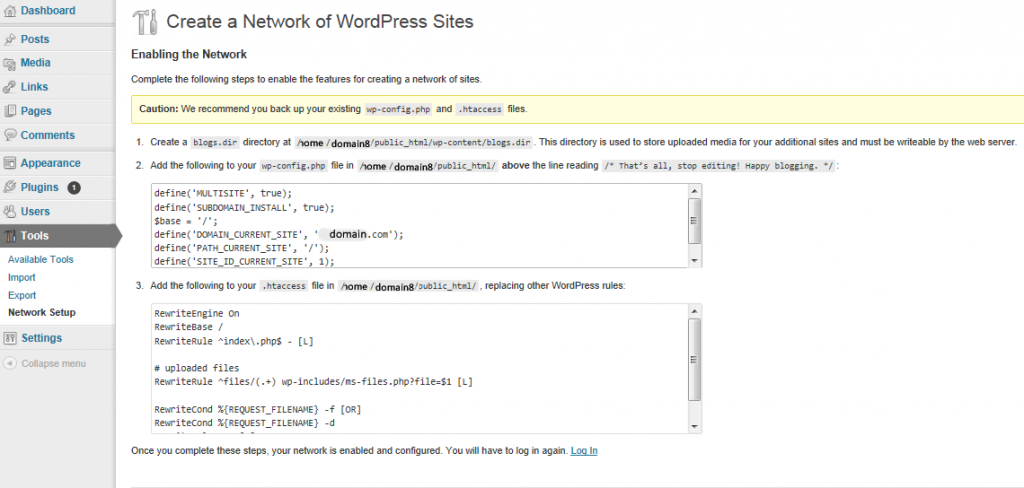
STEP 6. Click Install and you should be landed on a page similar to the screenshot below where you need to copy and paste the codes to a couple files, so go ahead and back up your wp-config.php and .htaccess in case something goes wrong. And then go ahead and follow the instruction. By pasting these codes to the 2 files, you are enabling the network. For codes in .htaccess file, please ensure you paste the codes within # BEGIN WordPress and # END WordPress comment lines as you may have other setting you do not want overwrite, so paste with care.

STEP 7. Once you done pasting and uploading the 2 files to your server, just click the ‘Log In’ link below the page to re-login. 
That’s it, you should be good to go. Now, for those of you who have other tips or better way to make the the set up easier, let’s share it below in the comment section.
Excellent article! Really helped me understand the Bluehost wildcard subdomain setup.
I have a question though. Do you have more input about why you should use a sub-domain rather than a subdirectory? I’ve reading other articles online and most lean towards setting up a sub-directory.